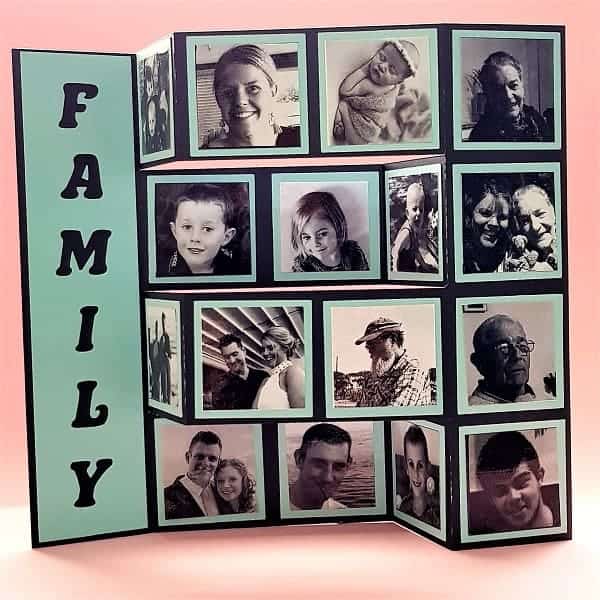
Would you like to make this super cool pop-up photo frame? I have included a free template for you in my Resource Library. It is very easy and I have included a couple of options to make it your very own personalized collage of photos.
This post contains some affiliate links for your convenience (which means if you make a purchase after clicking a link I may earn a small commission but it won’t cost you a penny more)! Read my full disclosure policy.
What Do You Need?
- 2 different colored sheets of A4 Cardstock (Thicker is better)
- Photos up to a maximum of 20.
- A small amount of contact if your photos are not already glossy
- Glue – I used double sided roller tape
- Something to cut it out with – Scan N Cut, Cricut or Exacto Knife
- Template from the Resource Library
Step 1 – Download the template
Download the pop-up photo frame template from the library. Upload into Canvas Workspace. Remove the wording on the template which is just a guide to let you know which piece is which and the “Family” template. These additional pieces will need to be cut out of a separate piece of card.
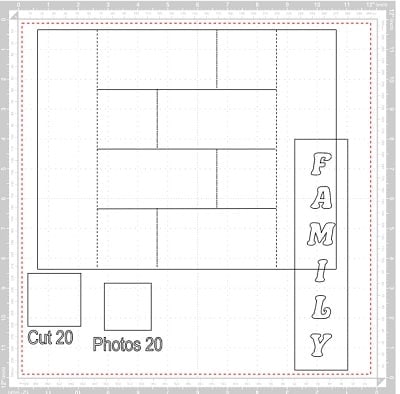
Double check that the dash (score) lines are in the correct format. It is usually a good idea to group the main parts of the frame together so you don’t inadvertently move them.
TIP:- If you would prefer to have scored lines instead of dashed remove the vertical lines and add them after manually. Options also include turning them into draw lines and using a scoring tool in your universal pen holder.
Step 2 – Transfer to your Scan N Cut
Once you are happy with what you are transferring to your Scan N Cut send the main template and cut that out. Then send the square that indicates to cut out 20 of them.
NOTE: If you are planning to use the “Family” template you only need to cut 16 squares.
Step 3 – Duplicate shapes on the Scan N Cut
If you are not using a Scan N Cut then skip to Step 4!
Send the single square to your machine. There is an easy way to duplicate this square on your machine. Follow these steps. I am using a CM900 so you may have a slightly different view.
Select the bottom icon.
Select OK to accept the sorted objects.
Click ok once you are happy with the location and click OK until you back to where you select cut.
Step 4 – Selecting your photos
Photos – collect up your photos that you would like to put onto your frame. Use the photo template square to assist you with the size that you need. The frame will take a maximum of 20 photos. If you use the “family” template there will be 16 square free for photos. You could also place a cute pattern in some of the squares using the photo template and have fewer photos.
The photos can be the tricky bit. First I printed them out so they were on one sheet of paper and then contacted the front of them so they were sealed. I had no contact so I simply used clear transfer tape on the paper. It worked well for me but would depend on what type of transfer sheet you are using.
Once the photos had the contact on them I scanned them with the Scan N Cut and placed the template square over the outside edge of each photo. One problem was that I only zoomed to 200x and ended up a little off on some of them. If you try it this way – zoom to 400x if you have that option.
I ended up fixing them with an Exacto knife. You may find it easier to simply cut them using the template square with the Exacto knife.
Another tip would be to draw with a black sharpie on the outside of the photos and then scan and cut.
Step 5 – Finishing your photo frame
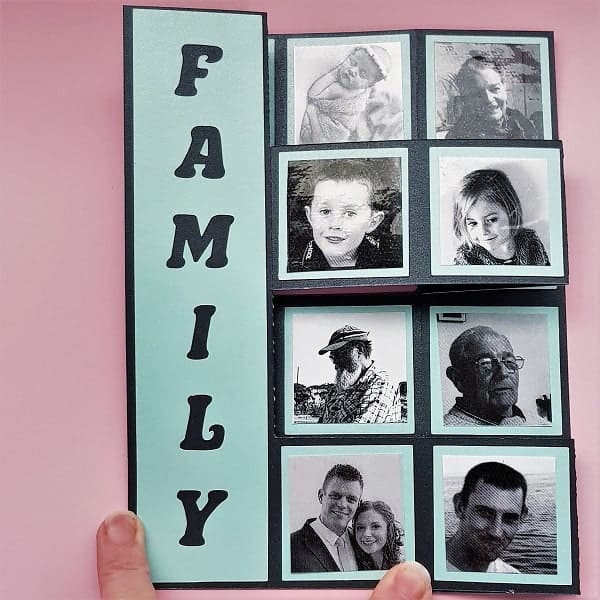
Once you have everything cut out you are ready to put it together. The frame itself can be folded in different ways so you can’t go wrong here. I folded two different ways and loved both.
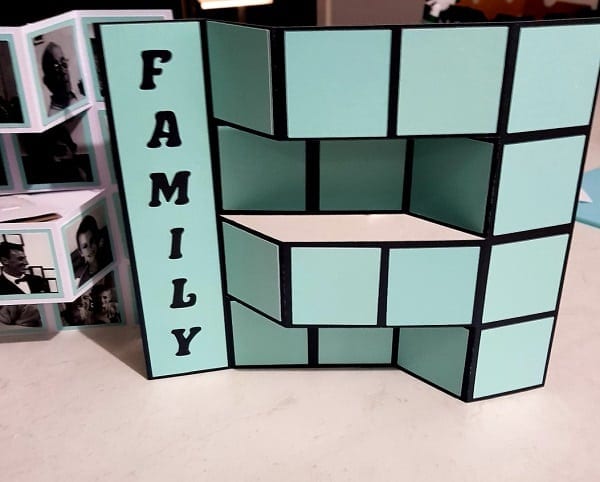
Lay your card out flat to stick your various squares in place, lining them up carefully. I used double sided roller glue which gave me a little bit of ‘move’ room as I lined them up.
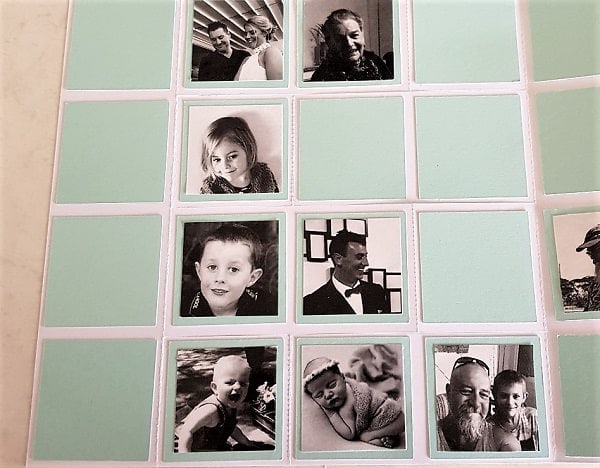
Step 6 – Place your photos
Next place your photos where you would like them to go on your pop-up photo frame. (still working with the frame flat). This part was fun picking and choosing where to place the various family members.
Step 7 – Finished pop-up photo frame
And we are finished! The pop-up photo frame can lay flat to send if you need to send it somewhere.
I hope you have found this tutorial helpful. Don’t forget I have a facebook group if you haven’t already become a member. I would love for you to join for more helpful hints, tips, and projects.
Until next time,
Happy Creating.

Don’t forget to check out some of the other projects while you are here.
- Scan N Cut Hacks To Save You Money
- Create Faux Leather Earrings – Scan N Cut
- Brother Scan N Cut SDX1000 – I bought another one!
- How to add Glyphs to Canvas Workspace
- How to Cut Fabric with your Scan N Cut

Like it – PIN IT!

Or this one 🙂


I love this one ?
I’m going to try to make this for the goodbye of my colleague, with pictures of us all!
Thank you…