That mat can be a little pesky! This post will cover how to clean your mat so that it stays sticky and then cover how to restick your Scan N Cut mat once the sticky is lost.
Unfortunately, I had only had my mat for about 3 weeks when I was having trouble with the level of stickiness it had left. Keeping the materials on the mat while cutting was starting to be a huge issue. The second the materials move the project is wrecked! This is so disappointing. (and can be costly)
While Brother recommends purchasing a new mat…. purchasing a new one every few weeks is often not an option.
It certainly wasn’t for me at all!
The way I now combat this issue is in a few steps, depending on the level of the problem (or you might say … stickiness).
Cleaning Your Mat
The first thing I work on is cleaning the mat with alcohol-free wipes… you know… baby wipes.
After each use would be ideal and recommended. However, I am often so busy with my project and intent on getting it finished, I end up doing it just before I start my next project. This is not great, as it delays the start of the project.

Masking Tape
My next ‘go-to’ is masking tape. The kind you use when painting so that you don’t get paint everywhere. It comes in different colors and I have blue and cream. The color you have makes NO difference at all. I would love some pink rolls LOL
If you feel like your card-stock or vinyl are not attaching to the mat quite as well as you would like then mask them down. I have tried sticky tape as well however due to the fact it is clear I have had a few issues with it.
Namely: Can’t see when you have left it on the mat and much easier for it to get stuck in the machine and stuck on the scanner. It also sticks to card-stock a bit more than I would like.
The masking tape is easy to see and you will have less trouble getting it off your card-stock and your mat.
Time To Restick Your Mat
Once all the other ‘fixes’ no longer work then it is time to head to the Zig glue and restick your Scan N Cut mat. This is a really easy process and basically consists of removing the old glue and putting the 2 way Zig glue on.
Work on a section at a time and ensure that you do NOT get it over the edge. The glue goes on blue and dries clear. Working in sections makes it easier to keep track of where you have placed the glue.
Allow your mat to dry completely.
Don’t be too heavy-handed applying the glue as it will make the mat too sticky.
NOTE: Be mindful of not damaging or gluing the registration marks. (Both the raised ones and the black marking on your mat.)
Once the Zig glue has dried and you have managed to restick your Scan N Cut mat!
Easy as that!
Mat too sticky?
What do you do if your mat ends up a little too sticky? Once it is dry, simply dab it with a tea towel or lint-free cloth. This will reduce the stickiness.
If you are still concerned, do a small test area with the material you are about to use on the mat.
While my mat looks a little tired and well-loved, I am amazed that it has lasted as long as it has. At some stage I will need to purchase a new mat…. but not yet 🙂
Happy creating!

Would you like to get more out of your Scan N Cut?
Have you used your scan feature on your Scan N Cut?
What about where to look to set up wifi or calibration.
Enroll in my Brother Scan N Cut Basics course for FREE.
Limited time only
Are you just starting out or perhaps a little intimidated by your Scan N Cut? This course is for you!
This newly created video course is a step-by-step introduction to using your Scan N Cut. It has been designed especially for YOU!
The course will show you how to use your Scan N Cut machine from the very start with minimal fuss and bother. This will allow you to create beautiful, cuttable designs.
Available for enrollment free for a limited time only!

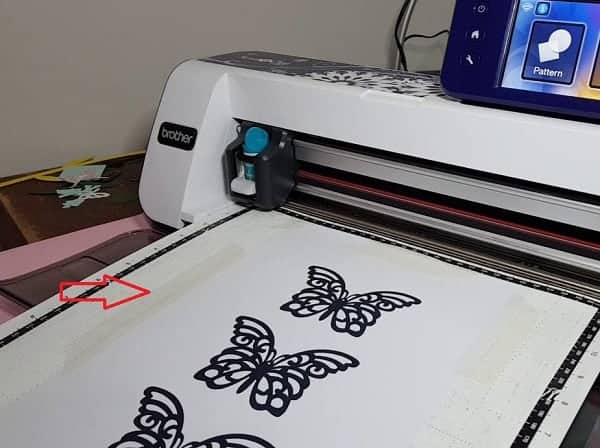
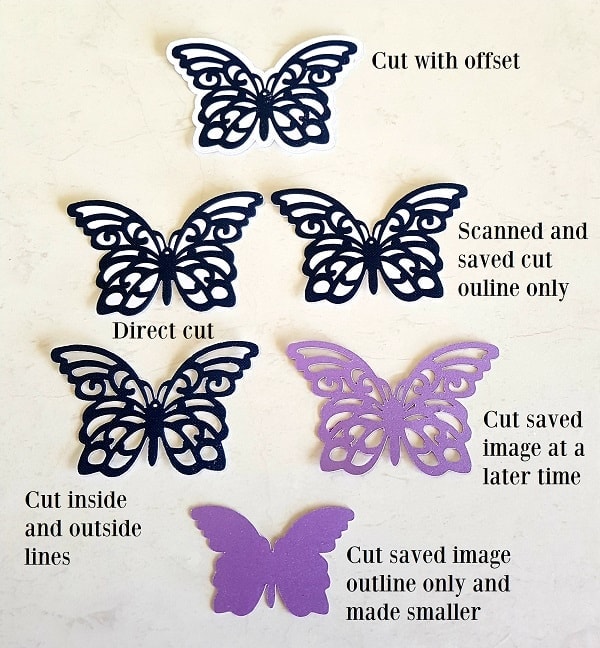
These butterflies have been cut from a free image downloaded from Pixabay.com. The image was printed out and then scanned. Another option is to use your stamps.
You can see the variations available to you using the Scan feature of your Scan N Cut. The scanning feature is what makes this cutting machine unique!
Join Me
Join me in the facebook group Scan N Cut ~ Let’s Create With Sue.
AND like my facebook page Create With Sue
PLEASE SHARE
Pin these to Pinterest


Excellent information. …..thank you She
Thank you for your help.
Thank you Sue for all the information and tutorials, not to mention all the free files, you’re so very generous! x
Hi Lesley, thank you for your kind comments. I am really pleased that you are enjoying the site and finding it helpful.
Thanks Sue for all of your help. I am finally in and look forward to a lot o f fun.
That is wonderful news Diana! I am so pleased. Thanks for letting me know 🙂
HELP!! I put the Heat n Bond side down of my project on the Scan n Cut mat.
Is it salvageable??
Hi Linda, yes you will be able to salvage your mat and possibly your material although that depends on the type of material and how well it lifted off the mat.
To resolve your mat issues you can use warm water and a drop of dishsoap. You may need the help of your scraper. If the Heat n Bond removes your mat glue with it then you can re-glue your mat with Zig repositionable glue, Aleen’s Tack it Over and Over OR Pinflairs book binder glue. I personally use the Zig as it depends what country you are in how easy the others are to purchase. Here is a number of mat tips to help you with any mat issues. https://www.createwithsue.com/dont-throw-your-scan-n-cut-mat-away/