Aren’t they cute? You too can make these super cute boxes with the FREEBIE template for your Scan N Cut or Cricut that you can download from my Resource Library. I originally started to design the boxes because my niece was getting married so we were all in wedding mode.
However
They are way too cute to keep for just weddings. They would make fantastic easy to make little gift boxes filled with chocolates….. (Don’t forget Mother’s Day is just around the corner).
OR
What about placing a battery tealight into them. How cool would that look at night!
Really you could use them for all sorts of occasions.
Scan N Cut tutorial
The focus of this tutorial is to assist you with how to Group and Ungroup in Canvas Workspace using the super cute freebie as a bonus!
The tutorial will work will any of your files that you load into Canvas.
What Do You Need
- 12″ x 12″ Card-stock.
- Freebie Pattern or other file that you prefer.
- Canvas Workspace.
- Something to cut it out with. I used my Scan N Cut but any cutting machine or craft knife.
- Glue.
- Ribbon or Cord.
Step 1- download the free template
Download the super cute box FREEBIE file to a location that you will find it again. Open Canvas Workspace online and upload the file into Canvas. (or use your own if you prefer.)
Watch this short tutorial if you need assistance with these steps. It covers uploading the file into Canvas and how to group and ungroup the file.
Canvas Workspace grouping and ungrouping
Video tutorial
The tutorial demonstrates how to group and ungroup your file. Even if you are not planning to make these super cute little boxes the tutorial will be useful for learning Canvas Workspace.
If you are confident with grouping and ungrouping skip this step.
Step 2 – send the box file to your Scan N Cut
Once you are happy with your project then send it to your Scan N Cut either by wifi or via your USB and cut it out.
Tip; Don’t forget to do your test cut if you are using a different medium to your last cut. I usually select the triangle.
Step 3 – easy to put the paper boxes together
Ok, lets put this together!!
This project is so easy to make. First, fold all the “box shape” score lines inwards. Then fold all the top cross folds outwards.

Once you have completed all the folds then add the double-sided tape (which I used in this particular box) or glue.
If you choose to use glue then it will be easier to do one side of the box first and then the other side. If you glue too many pieces at once you may get in a mess. (ask me how I know!)
Note: I tried different ways and preferred the double-sided tape as it gave me the neatest results.

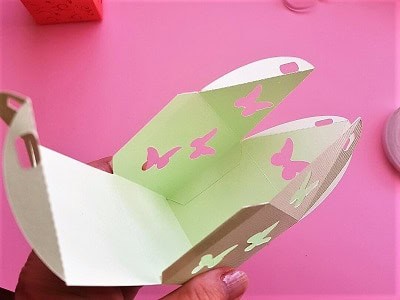
Once you have all sides stuck together of your box you are ready to place the ribbon or rope through the top holes which will pull it all together.
Turn the box into a gift
Before you tie it together add some goodies to turn your box into a lovely gift. I used Ferrero Rocher’s as I LOVE them and they look really nice with the gold wrapper. You can choose anything that you think will look (or taste) nice.
Alternatively, you could put a battery operated tealight in there for a lovely night light effect.

All there is left to do is to tie the bow. In this cute box, I used a very cheap wrapping tie and curled the ends. On the others, I used ribbon and silver string.

Think about what to use the leftover butterflies for.
I hope that you have enjoyed this project. I saved the little butterfly inserts that were cut out of the boxes and I am now furiously trying to think what to use them for. They are so cute!
Please join me soon for the next project. (it is nearly ready for release)
Happy Creating,


Join me on facebook
Join me in the Scan N Cut – Let’s Create With Sue facebook group.
I would love to see you there.
Scan N Cut Basics Course
Would you like to learn how to use your Scan N Cut to gain the most from it?
A free course is available for you – check out what is on offer!
Why don’t you say hello at [email protected]. I would love to hear from you!
If you find this page useful then others might too! Why don’t you share it on Facebook or Pinterest so others can benefit too.