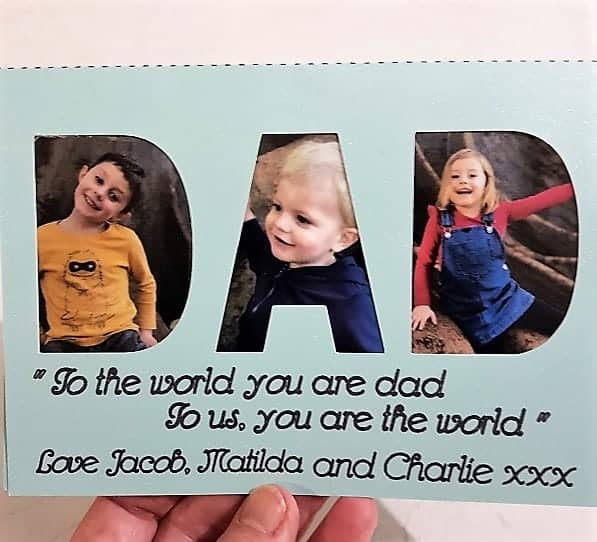
How cool to make your very own personalized card for Dad on Father’s Day. This card is super easy to do and I have included instructions just in case you need them. You are able to download the free template from the Resource Library or follow the video and create your very own.
This project came about because my daughter rang me and asked if I could put a Father’s Day card together for her. We have Father’s Day coming just around the corner and she was keen to do something special.
The photos add personalization to the card and make it a really great keepsake and something to treasure.
What do you need
- 1 piece of A4 card-stock for the main card
- Smaller piece for the insert (optional)
- Photos of your kids
- Something to cut the file out with. I used my Scan N Cut
- Double-sided tape or glue
- Clear contact (optional)
- Download the file from the Resource Library or make you own
- (File is SVG for Design Space, FCM for Scan N Cut and PDF for and Exacto knife)
The finished size of the card is 7″ wide by 5″ high.
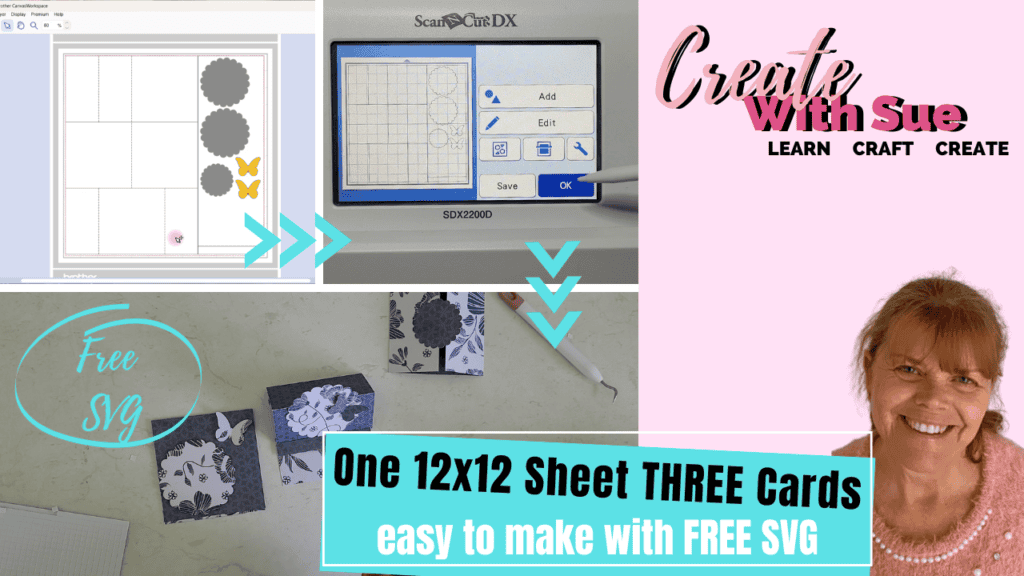
Creating the file in Canvas
If you would like to make the card cut file yourself I have made a video of the process for you. This is a GREAT learning exercise for you. I have to apologize for my voice in the video (and I had a little bit of trouble with my brain) I have had a cold and my head and voice are not themselves. So bear with me.
For those who would prefer just to cut the card out, head over to the Resource Library and grab the template.
Font
For the verse, I selected the font Rhumba Script which is a ‘single line’ font. It is a free font from dafont.com. ‘Single line’ fonts are a finer style font and if used small enough they will draw out as a single solid line when using the pen tool on your Scan N Cut.

Adding Text
For the cut out lettering, I recommend that you choose a large open font to maximize the ‘window’ for the photos.
If you are using the online version of Canvas Workspace, either select an inbuilt font or else set up the writing in the Brother Type Converter. Then import the file or files into Canvas Workspace.
Note: The cut-out lettering in this project was an inbuilt font located in the top left of the Text selections. It is called Antique Oakland Bold.
The downloaded version of Canvas Workspace will allow you to choose from all the fonts installed on your computer.
The Photos
Select the photos that you would like to use for your Father’s Day card. The photos need to be the correct size to fit behind the lettering. I set their size to 6.5 cms high and 5.1cm wide and printed them out on white card-stock. You may already have photos that fit and can be used in the project.
Before cutting them on the Scan N Cut, I covered them with contact. Using the Scan N Cut, the photos were then scanned and an outset was added to give them an edge. If you do not wish to do it this way simply ensure that your photos are big enough to sit behind the cut-out section on the card.

Placement
Once cut out, add the double-sided tape to the very edges of the front side of the photos. There is no reason you couldn’t use glue for this task if you prefer however I personally find the double-sided tape easy to manage in this type of project.
Place the photos behind the cut-out DAD section of your Father’s Day card and you are nearly done.
Glue the insert inside the card. I have put mine at the back of the photos to tidy the inside up a bit however you could use it to write a further sentiment in your card.
Finished
I hope that you have enjoyed this tutorial. I would love to see what you have made. You are welcome to post a photo in the Scan N Cut ~ Let’s Create With Sue. facebook group.
Happy creating!

Would you like to get more out of your Scan N Cut?
Have you used your scan feature on your Scan N Cut?
What about where to look to set up wifi or calibration.
Enroll in my Brother Scan N Cut Basics course for FREE.
Limited time only
Are you just starting out or perhaps a little intimidated by your Scan N Cut? This course is for you!
This newly created video course is a step-by-step introduction to using your Scan N Cut. It has been designed especially for YOU!
The course will show you how to use your Scan N Cut machine from the very start with minimal fuss and bother. This will allow you to create beautiful, cuttable designs.

These butterflies have been cut from a free image downloaded from Pixabay.com. The image was printed out and then scanned OR another option would be to use your stamps.
You can see the variations available to you using the Scan feature of your Scan N Cut. The scanning feature is what makes this cutting machine unique!
Join Me
Join me in the facebook group Scan N Cut ~ Let’s Create With Sue.
AND like my facebook page Create With Sue