
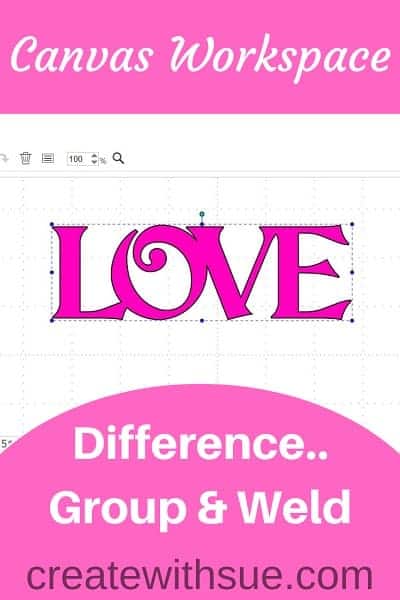
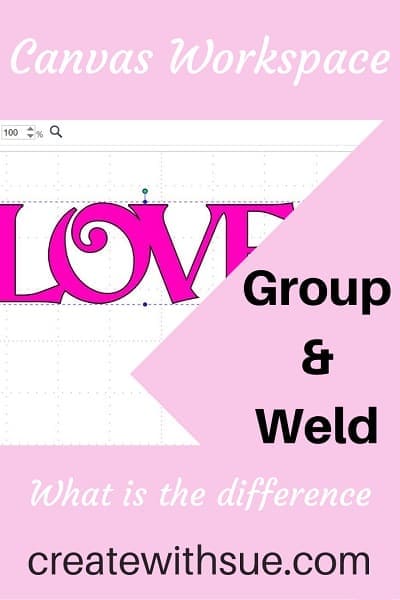
Whether to Group or Weld. What is the difference between grouping and welding in Canvas Workspace?
One of my awesome group members asked me what was the difference between grouping and welding in Canvas Workspace so I have created a quick tutorial to share with you all.
If you are short on time and prefer to only watch a video then click into the table of contents and choose the Video Tutorial
This post may contain some affiliate links for your convenience (which means if you make a purchase after clicking a link I may earn a small commission but it won’t cost you a penny more)! Read my full disclosure policy.
How to GROUP in Canvas Workspace
The quick steps on how to group in Canvas Workspace are:
Step 1 – select the objects
Select the objects or items on your Canvas Workspace mat by either drawing an imaginary box across them or by holding the shift key down and selecting each object individually. There is also a third option of going up to the Edit tab and selecting the Edit icon in the online version of Canvas Workspace or Select All if you are in the downloaded version. The Edit icon will select ALL items on your Canvas Workspace mat the same as Select All.
Step 2 – group the objects
Once you have all the objects selected that you want to be grouped, go up to the Edit tab in Canvas Workspace and select the Group icon in the online version OR the Layer tab in the downloaded version of Canvas Workspace and select Group. You also have the option to right-click the highlighted object and you will see the Group and Ungroup options are available to you.
Step 3 – Ungrouping again
To ungroup you simply reverse the above steps – easy really isn’t it. Often things you think may be complicated are not once you have been shown how to do them.
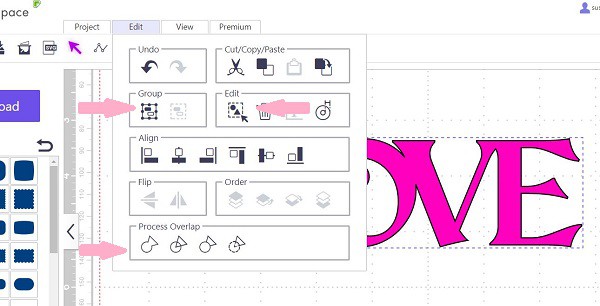
In the picture above you can see the Group icon, the Edit icon and also note the Process Overlap section down the bottom. We will cover that next.
When to group
Grouping has some wonderful uses. I use it heaps.
- You can group and ungroup to resize all objects at the same time to ensure you keep the size ration correct. You may only group it while you resize and then as soon as you have finished then you can ungroup again.
- Grouping your project makes is so easy to move around your Canvas mat or your Scan N Cut screen. NOTE that you can group directly in your Scan N Cut machine.
- If you have a complex design, grouping can keep it easier to manage
- When sending only particular sections of your project to your Scan N Cut you can group the objects you don’t want to send in that pass so they are easier remove from the sending process.
Actually, I could probably go on and on here. Suffice to say Grouping is an extremely handy function. You can group and ungroup even after you have saved your file, you can group and ungroup it again in a years time.
How to WELD in Canvas Workspace
Step 1 – this is the same in both grouping and welding
There is no difference between grouping and welding for this first step. You still select the objects that you would like grouped and follow Step 1 above.
HOWEVER, not all objects will weld.
Tips for resolving issues with the welding process
Things that may possibly cause some issues for you when trying to weld are:
- If the objects do not overlap enough this may cause your weld to fail – try moving them closer.
- A double overlap may cause issues. This is where lines don’t just overlap the first section of the object, they overlap multiple. An example of this may be part of the text where a letter may cross over two lines and out the other side. While this will not always occur, if it does then to fix this you would simply need to adjust the placement of one of the letters.
- Occasionally Canvas won’t weld multiple objects in one process. The workaround for this could be selecting smaller groups of objects (even two at a time) and weld them then add another part of the project and weld that one.
- Objects with open paths will not weld, producing an error message. This can actually be quite difficult to troubleshoot depending on your project. It can be fixed by checking the nodes in your project and locating where the open path is and closing the path. This is not normally beginner troubleshooting.
The above issues may not occur for you however I have included the cause and fix in case you come across them. In contrast, pretty much everything will group.
Step 2 – what icons to choose for weld
Online version of Canvas Workspace
Once you have the objects that you would like welded together selected, then you can go up to the Edit tab in the online version of Canvas Workspace and look towards the bottom of the popped out menu to the Process Overlap section at the bottom and choose the first icon – weld. This will cause your software to process the request and complete the weld.
Downloaded version of Canvas Workspace
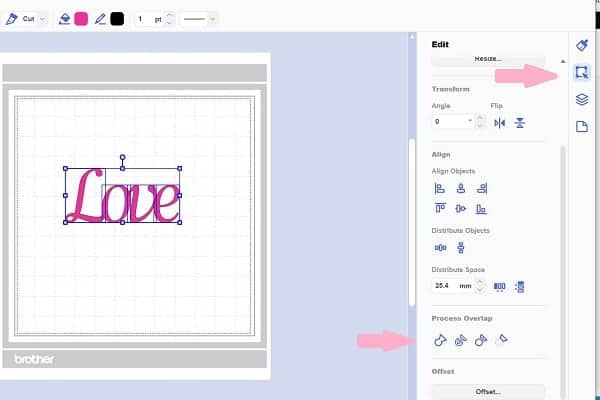
In the downloaded version of Canvas Workspace, you still need to make sure you select the objects that you want to weld together however there is a separate menu bar on the right-hand side of Canvas.
Select the Edit icon which is the top right-hand icon with the arrow pointing to it in the picture below. This will produce the screen as shown. Look down the bottom of the screen and the same Process Overlap section will be available. Choose the first icon which is the weld icon.
When to weld
Welding is a much more permanent solution than grouping is. You can group and ungroup to your heart’s content… welding does not provide you with that option. You may be able to undo a weld by clicking the undo icon on the menu bar but this will only work while it remains in the memory, after that, it is quite difficult to back out of a weld.
Why would you use weld? Well, welding is a great tool to unify or turn multiple objects into one object so that they cut out as one piece. A great example of this is when you want text to cut out in one piece as opposed to lots of separate letters or pieces. Even if you were cutting your text design in vinyl, it would give you a much nicer effect when the letters join through welding than if they are stuck together.
I found this out in one of my very first projects I ever did when I made a decal for my car.
Video tutorial – the difference between Grouping and Welding
This video will show you through the above steps in the online version of Canvas Workspace. I do hope that you find it easy to learn from.
Summary
The main differences between grouping and welding are:
1. Grouping is not a permanent process and welding is more permanent.
2. Welding will permanently join multiple objects so that they cut out as ONE piece.
Until next time,
Happy creating,

P.S I have a heap of tutorials dotted throughout the website all designed to help you on your crafting journey. Check them out.
Two versions of Canvas Workspace – What’s the difference
This one below goes over the differences between the TWO versions of Canvas Workspace.
Here is a list of the latest posts.
- Brother Scan N Cut SDX1000 – I bought another one!
- How to add Glyphs to Canvas Workspace
- How to Cut Fabric with your Scan N Cut
- Valentine Heart Card – Scan N Cut
- What To Do With Your Cardstock Scraps

Join me on Facebook
Join me in the Scan N Cut – Let’s Create With Sue Facebook group. It is a group of awesome craft friends sharing and caring.
I would love to see you there.
OR say hello at [email protected] or [email protected]. I would love to hear from you!
Would you like to learn the Scan N Cut Basics?
I have a free course on offer to assist you to learn some of the basic features of your Scan N Cut.
LIKE IT! PIN IT!
Don’t forget to share so others can find this tutorial


Thank you sooooo much for this tutorial. I was trying to make a pattern longer – just add on 2 cm at the bottom and it would NOT weld. After reading this tutorial I decided to try again and this time I got it right! I feel like you have saved my sanity. Thanks again
Hi Janet, I am so pleased :-). Thank you for letting me know.